
Background: Why We Chose a DIY Denture Kit
My partner had many of her lower molars removed last year. After she healed, we wanted her to have dentures again so she could chew properly. Unfortunately, insurance said they would not cover partial dentures because they considered them cosmetic.
So we decided to take matters into our own hands.
After researching different options, we found the DentureWay DIY denture kit and decided to give it a try as a more affordable solution.
Shipping and First Impressions
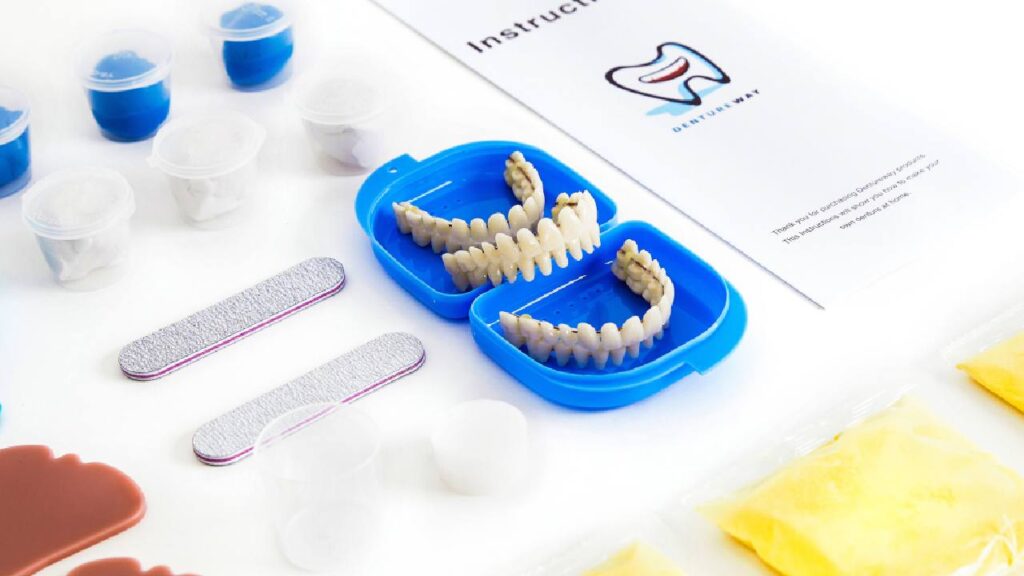
After purchasing through Amazon, shipping was fast. The package arrived in good condition, with nice packaging and all the pieces that were described.
The teeth and mold-making materials appeared to be good quality right out of the box, which gave us confidence to move forward.
Understanding the Directions (and the Learning Curve)
Let’s just say the printed directions are challenging.
We had to read them multiple times, and even then, the wording did not feel like completely “normal” English. There are images included, but they are hard to see clearly, and it is not always obvious which part of the directions refers to which image.
We shared this feedback with DentureWay, and they acknowledged that clearer wording and visual guidance would make the process easier. It was reassuring to know that user feedback is being taken seriously and used to improve future instructions.
Other reviews also mentioned watching DentureWay’s videos online, which helped a lot. Even with that, there is definitely a learning curve before you feel confident starting.
First Build Attempt
Making the Mold of the Teeth
After laying out all the materials and choosing teeth from the multiple color options, we mixed the blue and white putty together to make a mold of her teeth.
After a couple of minutes setting in her mouth, the blue mold material got stuck to itself and bridged between the spaces near the gums. Removing the mold was difficult, and we struggled for a bit to get it off.
Once it was removed, we realized what had happened.
Important note:
People with receding gums should use a thin plastic wrap (such as Saran Wrap) over the teeth before inserting the mold. This helps prevent the mold from bridging between teeth and makes removal much easier. This tip made a big difference on the second attempt.Read more tips about Take a good dental impression.

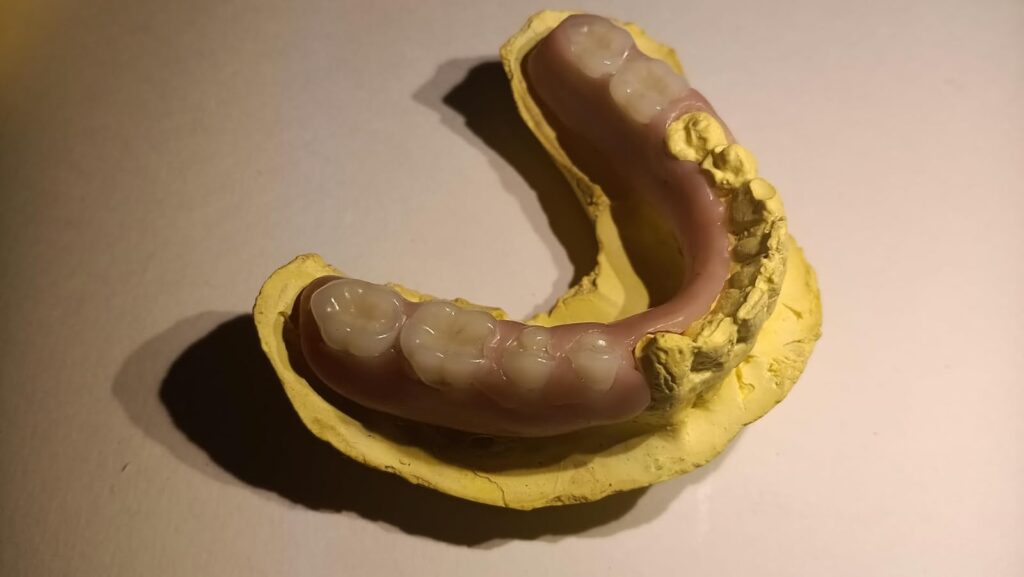
Making the Stone Cast
One important issue we ran into early was the stone mix. The directions say not to worry and that you can take your time after mixing, but in reality, it started drying quite quickly. This resulted in a cast that was not smooth or fully accurate.
Based on later guidance, we adjusted our approach during the stone casting stage. Techniques such as filling the mold gradually, gently tapping or lightly vibrating the mold to release air bubbles, and using plastic wrap in certain steps helped improve surface smoothness and overall accuracy.
When we remade the cast with a thicker base, the strength and durability improved significantly. This reinforced how important proper thickness and preparation are during this step of the process.
Note: Other points regarding the stability and reliability of plaster models

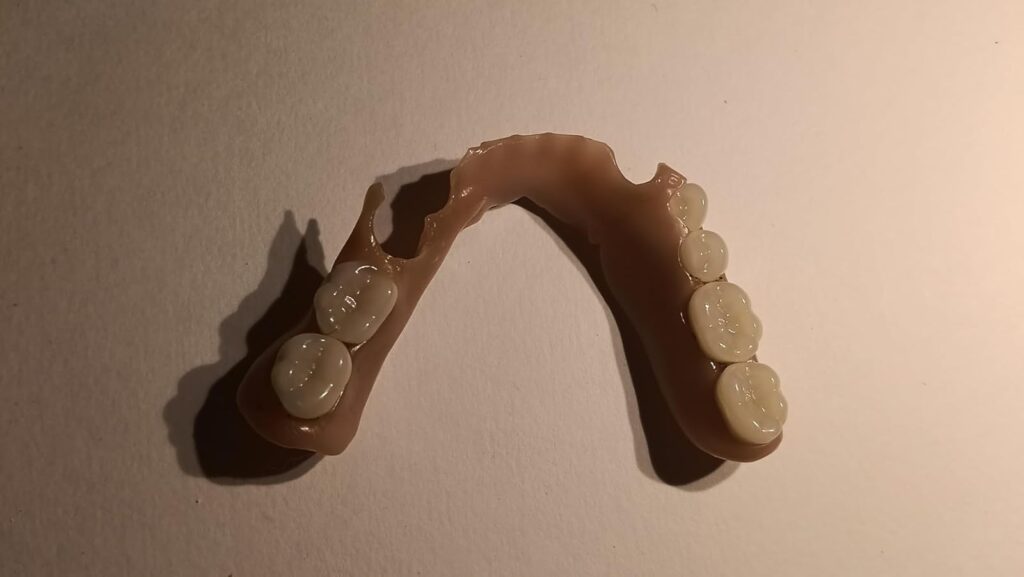
Building the Denture
The gum material was actually one of the most interesting parts of the kit. After boiling in water, it becomes soft and molds nicely to the stone cast.
To make a partial denture, you need to cut the material with scissors while it is soft. Positioning everything so it works naturally with existing teeth takes a lot of imagination, testing, and patience.
One of the best things about the gum material is that it can be re-melted and reshaped, which makes the process somewhat forgiving. However, we learned that if the gum material is re-softened with the teeth already embedded, the teeth will sink slightly deeper into the gums each time.
Our takeaway was to try to get as close as possible by rounds three or four to minimize issues.
We also found that it is possible to re-soften only certain areas of the denture by dipping just part of it into boiling water. This allows for fine-tuning specific sections without reshaping the entire piece.
Second Build Attempt: What Changed
Starting over felt like the right decision for us.
The second attempt was noticeably easier because of everything we learned during the first round. The improvement showed clearly in the result.
Even then, the fit still needed to be adjusted several times to feel accurate. For the final adjustment, we re-softened only the front portion of the gum material that sat between both sides. Instead of using the cast, we placed it directly into her mouth and allowed it to harden there.
It’s unclear whether this approach would work for everyone, but in our case, it worked and resulted in something usable.
End Result: Was It Worth It?
In the end, this was truly a labor of love.

We ended up with a workable denture that did not cost a lot of money, and we learned a great deal throughout the process. With the extra gum material and additional teeth in different colors, we may even try making another set in the future.
Time Invested and Who This Is For
To be honest, this is not an easy endeavor.
I have an artistic background and experience working with my hands, which was a real advantage. Between both attempts, we invested about eight to nine total hours.
I genuinely enjoyed learning the process, but some people may not have the patience or skills required. That said, having a talented friend help could make a big difference.
Final Thoughts
Being willing to take on a challenge is essential.
Confidence, patience, and a positive mindset go a long way. If you don’t believe in your ability to create something with your hands, this may not be the right option.
For people who need dentures, cannot afford traditional options, and are willing to invest time and effort, this can be a meaningful solution. In our case, it ended up being a thoughtful and worthwhile gift for my partner.
Editor’s Note
This article is based on a real hands-on experience shared by a DentureWay user. It documents the full process of making partial dentures at home using a DIY denture kit, including challenges, adjustments, and lessons learned along the way. The content below reflects the user’s own experience and practical takeaways.
Thank you so much, J. — truly.
What you shared goes far beyond a review. It’s real experience, real effort, and something that will genuinely help others who are just starting out. That kind of openness makes a difference, and we’re grateful you took the time to write it.
We also really appreciate your thoughtful feedback. The points you raised are fair and important. We’re already working on improving these step by step, so the next person has a smoother path than you did.
Wishing you and your partner all the best — and many comfortable, confident smiles ahead.
And to everyone reading this: may you find your way back to smiling again.
Dentureway Team